Micronet displays the Debtor Contract Selection screen.
Micronet displays the Debtors Contract File Update screen in Update Mode.
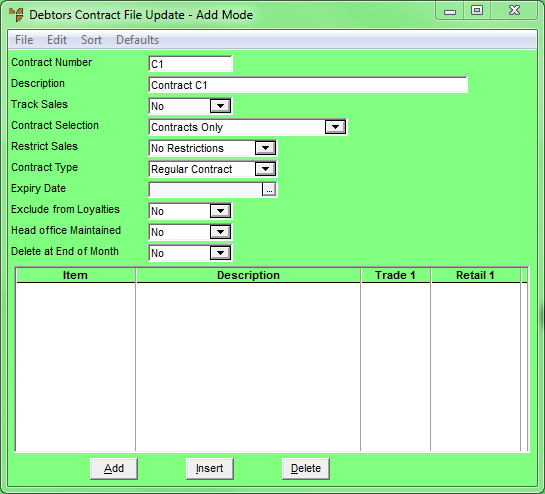
Micronet displays the Debtors Contract File Update screen in Add Mode.
|
|
|
Technical Tip To recall an existing debtor contract:
|
|
|
Field |
Value |
|
|
Contract Number |
Enter the debtor number. |
|
|
Description |
Enter the customer name. |
|
|
Track Sales |
Select Yes if you want Micronet to track contract sales, or No if you don't. If you select Yes, Micronet stores the contract number details within the invoice history file for referencing via reports and inquiries. |
|
|
Contract Selection |
Select Contracts Only so that Micronet always uses the contract price for contract customers during sales invoicing, regardless of the price. |
|
|
Restrict Sales |
Select No Restrictions. This means the contract pricing can be used for any order entry type (invoice, slip, quote or batched invoice). |
|
|
Contract Type |
Select Regular Contract. |
|
|
Expiry Date |
Leave this field blank for an open contract. |
|
|
Exclude from Loyalties |
Select Yes if items sold using this contract should attract customer loyalty credits, or No to exclude these items from loyalty credits. |
|
|
Head office Maintained |
Select Yes if this contract can only be maintained in head office, or No if it can be maintained in branches as well. If a contract is Head Office maintained, store users cannot edit the contract at all. |
|
|
Delete at End of Month |
Select No to retain this contract after End of Month processing. |